Monday, October 18, 2010

everyday comfort

It's getting dark earlier, cool enough for sweaters, and it occasionally rains.  Perfect for salted caramel hot chocolate from Starbucks and good, hearty comfort food for dinner.  But let's face it, most people aren't really interested in eating a heavy, rich, (DELICIOUS, but unfortunately rich) meal on a normal week night.  So we all come up with ways to cut calorie corners and sacrifice flavor.  Not my style.  But I don't want to pack back on all of those baby pounds I've finally lost.  Which is why I bought this book.  I trust them to make delicious food.  And why not healthy delicious food, right?

Well, this isn't a recipe from their book, but I wanted to follow their philosophy of delicious healthy food.  But not as a wannabe version of something else.  I'm kind of a purist about ingredients and their purposes.  I don't think of tofu as a meat replacement.  I don't think pureed cauliflower can be a substitute for mashed potatoes.  Olive oil isn't a healthy alternative to butter.  Tofu, cauliflower, and olive oil each have their own gorgeous place in our palates.  Don't cheat them by using them as "healthy alternatives".  No, no.  Food is meant to be enjoyed and celebrated for what they are.

So let's not kid ourselves and think of this as a spaghetti and meatballs recipe.  Because it's not.  It's a turkey and vegetable "meatball" pasta recipe.  it's just a new thing.  But a nice hearty dinner without the guilt.  And I love it.  And it's pretty good for you.  But if you want real spaghetti and meatballs, please use lots of good meat and make it rich and hearty.  But for our Monday night, this worked out great as a new dish.

Turkey and Vegetable Meatballs with Spaghetti
1 lb spaghetti

for the sauce:
2 cans whole tomatoes
2 T tomato paste
1/2 onion, minced (reserve the other half for the "meatballs")
1 carrot, minced
2 cloves garlic, minced
extra virgin olive oil
salt and pepper to taste

for the "meatballs":
1 lb lean ground turkey (go for the 93/7, not the "extra lean" 99% fat free kind. you need that teeny little bit of fat to make it a juicy meatball)
1 carrot, minced
1/2 onion, minced (the leftovers from making the sauce)
3 cloves garlic, minced
1/4 C loosley packed flat peal parsley, minced
8 oz mushrooms (I used cremini, lots of good meaty flavor and makes the meatballs nice and moist), minced
1/4 C frozen spinach, thawed, and chopped small
2 T toasted walnuts (I know, weird. But it's an amazing texture and flavor), processed fine in the food processor
1/2 C freshly grated parmesan cheese
1/2 C panko
1 egg, lightly beaten
salt and pepper to taste (go easy on the salt, though.  The cheese is plenty salty)
  1. In a large, heavy bottom pot, heat about 1~2 tablespoons of extra virgin olive oil over medium heat.  Add the onions, and carrots, salt, and stir together occassionally until completely softened and browned, about 15 minutes.  Add tomato paste and cook, stirring constantly, until the color changes to a reddish-brown.  Add the 2 can of whole tomatoes, breaking them up as you cook (or, if you prefer, pour them into a large bowl and crush them with your hands before adding to the pot).  Add salt and pepper to taste, bring the sauce down to a low simmer, and let cook until meatballs are done.
  2. Meanwhile, preheat the broiler.  In a large bowl, combine all of the ingredients for the meatballs and make each meatball with about 3~4 T of the veggie/turkey mixture.  Evenly space the meatballs on a baking sheet and place under the broiler until nice and browned and crunchy on top.  Add them to the pot of sauce and continue to simmer until meatballs soak in all the flavor and cook all the way through.
  3. Cook the pasta to al dente.  Right before tossing the pasta into the sauce, take out the meaballs (they're pretty fragile because they're mostly vegetable), and set aside.  Toss the al dente pasta right into the sauce pot, adding some pasta water to loosen the sauce if necessary.  Serve sauced pasta with meatballs op top, and a little extra sauce on top of that.  Parsley and cheese, if you want:)  Oh, and a slice of good, crusty bread.  Yum!

Thursday, September 30, 2010

i'm in love with bread

... but we all know that, right?  I mean, don't I talk about good bread about every 3~4 posts?  I think so.  I made some more of my favorite bread the other day so I could make some eggplant toasts.  But I went with a teeny batard shape instead of the typical boule, and made my eggplant toasts more like a healthy variation on eggplant parmesan.  If you don't cook much eggplant, here's a good place to start.  Super simple and delicious.  And you'll fall in love with the perfect, buttery, creamy texture of eggplant.
baked eggplant parmesan toasts
serves 4
 2 large crusty rolls, cut in half lengthwise, like a hot dog bun
1/2 C homemade tomato sauce (I used diced tomatoes, but next time I think I'll use crushed, this was too chunky), or just some chopped up tomatoes with salt and pepper
super thin sliced red onions
4 oz mozzarella cheese, grated (if you have fresh mozzarella, you can freeze it to grate it)
1/2 globe eggplant, sliced about 1/2 inch thick.  You should have 8 slices.
2 slices of stale bread
1/4 C parsley
2~4 T grated Pecorino Romano cheese (or Parmigiano Reggiano)
2 eggs
1/2 C flour
salt and pepper
canola oil spray
  1. Preheat the oven to 400°F.  Line a baking sheet with parchment paper and place a cooling rack on top.  Toast the stale bread slices in the toaster and let cool.
  2. Beat the eggs in a shallow dish and set aside.  In another shallow dish, place the flour and season with salt and lots of pepper.
  3. In the bowl of a food processor, pulse together the toasted bread, parsley, and Pecorino Romano cheese.  Place seasoned breadcrumbs in another shallow dish.
  4. First dredge the eggplant slices in the seasoned flour, then dip in the egg mixture, letting the excess drip off, and then coat with the breadcrumbs.  Place them evenly spaced on the rack over the parchment lined baking sheet.  Spray lightly with canola oil spray.  Bake in the oven until the eggplants are cooked through completely and the crust is golden brown, 15~20 minutes.
  5. Take the 2 tops and 2 bottoms of the loaves of bread, and place them on a baking sheet crust-side down.  Spread 2 tablespoon of sauce, place 2 slices of the eggplant, (and a little more sauce, if you like) then a tablespoon of grated mozzarella and pecorino cheeses, and the sliced red onions on top.  Place under the broiler for a few minutes (depending on your broiler--so keep an eye on it), until cheese is bubbling and browned.  Serve hot.

fresh

We have a farmer's market here.  Like a real one.  I know, all of you out there in places like California or NYC or even SLC are thinking, "what?  All this time she didn't have one close by?"  And my answer to you is ... no.  Fortunately, we had cute little farm stands here and there, but you had to go searching for them.  But that's better than nothing.  But here in Bloomington?  We have a REAL FARMERS MARKET!  And I've been addicted since we've moved.  Our weekly Saturday morning ritual is to get up, eat a quick breakfast, get ready, and GO.  And once we're there, the first thing I do is buy a little carton of cherry--or other variety of teeny, snackable tomatoes--for my 2 year old daughter to munch on while we browse through all of the different vendors.  There's one that I feel particularly pressed to visit every week because not only do they sell amazing produce, they are Asian.  And we Asians support each other.  And they're so nice and have stuff that other people don't.  Like nashi (Japanese pears), and Thai basil for $0.75 a bag.  Not kidding.  $0.75 a bag.  A big bag.

Anyway, there I was with a bunch of pretty, colorful cherry tomatoes one Tuesday morning, with no lunch planned for me and the kids.  But thankfully I had made some good bread the day before, and a whole handful of sweet basil from my friend's backyard garden, so I made us a quick cherry tomato bruschetta.  And it was quite satisfying.  It might have been the hearty bread we ate it on.  Whatever it was, I was in heaven.


quick cherry tomato bruschetta
6~8 basil leaves (more or less, depending on what you like.  I like as much fresh herbs as possible--especially when it comes to sweet basil), rolled up and sliced thin with a shaaaaaarp knife.
1 pint cherry tomatoes, cut in half across the middle, not pole-to-pole
2~4 T extra virgin olive oil
1/2 garlic clove, minced or grated
salt and pepper to taste

2~4 slices of good, crusty bread, toasted
  1. In a medium bowl, combine the basil, tomatoes, olive oil, garlic, salt and pepper.  Toss to combine.  The longer you let it sit, the more the flavors will meld together.  Mmm.
  2. Pile on as much or as little of the tomato mixture onto your crusty bread and eat immediately.

Wednesday, September 15, 2010

out of it. again.

I've had a crazy few weeks.  That's my excuse, anyway.  We moved from Elkhart, IN to Bloomington, IN.  My kids are doing awesome and my cute husband started grad school.  The crazy stuff included having to move twice because management here put us in the wrong kind of apartment, all sorts of moving truck drama, getting in a car accident (not our fault, thank goodness), and a whole host of other interesting experiences.  But in the long run, it's been exciting and very tiring.  So that's why I haven't been in the kitchen like I should.  I'm sorry, friends!  But now we're settled (well, getting there), and feeling happy about life, and I have been happily cooking and baking away.

So here's a recipe for the last meal I cooked in my kitchen in Elkhart.  Wasn't my favorite space, but I feel like I grew so much in my style and skill, and in a lot of ways I miss it.

Prosciutto and Vegetable pasta
for 1 lb of pasta
1 lb long pasta, such as linguine or spaghetti
2 small zucchini, cut in half lengthwise and sliced thin at an angle
1 small onion, chopped fine
2 cloves garlic, minced
4 ounces of thin sliced prosciutto, about 8 slices, cut into small pieces
extra virgin olive oil
salt and pepper to taste
2 T finely shopped parsley
zest of 1/2 lemon
juice of 1/2 lemon
parmiggiano reggiano cheese, grated
  1. Bring a large pot of water to a boil.  Add salt, cook pasta to al dente, reserving about 1/2 C of the cooking water.  Drain and set aside.
  2. Meanwhile, in a large saute pan, heat about 2 T of olive oil over medium-high heat.  Add the garlic and onions, and cook until fragrant and softened.  Add the zucchini, and cook until softened and very lightly browned.  Add the prosciutto, season with salt and pepper, stir until the prosciutto is curled and a little crispy.  Take off the heat and set aside.
  3. In a large bowl, toss together the pasta, zucchini/prosciutto mixture, juice and zest of the lemon, parsley, and cheese.  Serve with an extra little drizzle of the oil.

Thursday, August 5, 2010

my favorite

I've had a lot of people tell me how much they love the one ingredient ice cream I shared a while back.  I'm so glad I discovered it and could share it with all of you!  I've loved hearing what you've added to it to make it your way.  The other day I added nutella.  Nutella makes everything better.  It was really neat because the nutella hardened a little bit so there were teeny pieces instead of it getting blended in completely.  So good!

Have you tried anything to make your ice cream your own style?

best granola ever

My sister introduced me to a glorious recipe for granola.  Ever since then, I've been dreaming about it.  My healthy stuff didn't cut it anymore.  I had to have the real stuff.  And really, if you eat it in moderation, it's not that bad for you anyway.  I made some adjustments based on what I had in the pantry and my own likes and dislikes, but I fell in love with the idea of dowsing it in vanilla.  Amazing!  Why didn't I think of that before?

Serve it with some plain yogurt and fresh fruit and you have a dreamy breakfast.  (And if you have as much of a sweet tooth as my sweetie, drizzle with a little honey.  Though it definitely does not need it)  Best breakfast ever, in fact.  Well, it's up there with a few other things, maybe.

Homemade granola
makes about 7 (-ish) cups
4 C rolled oats (not quick-cooking or instant)
3/4 C wheat germ or 1/2 C ground flax seeds
1-1/2 ~2 C nuts (I used chopped hazelnuts, halved pecans, and whole almonds--my favorites)
1 C flaked (shredded is fine, too) unsweetened coconut (sweetened is fine, but will obviously turn out a lot sweeter)
1/2 C light brown sugar
1/4 C honey
1/4 C canola oil (or if you're ok with a little fruity flavor, go extra virgin olive oil!  It bakes up really mild and SO tasty!)
1 T pure vanilla extract
1/4 t salt
1/4 t cinnamon
  1. Preheat oven to 350° F.
  2. In a small pot, heat oil and honey until smooth and honey is thin.  Stir in vanilla and set aside.
  3. In a large bowl, combine the oats, wheat germ (or flaxseeds), nuts, coconut, brown sugar, salt, and cinnamon.
  4. Pour the honey/oil/vanilla mixture over the oat mixture and stir to combine.
  5. Spread all ingredients onto a rimmed baking sheet in an even layer.  Bake for 30~35 minutes, until fragrant and lightly browned, tossing once or twice during baking.  Let cool completely, then store in an airtight container.  
  6. Serve with yogurt, milk, fresh or dried fruit and some extra honey.

Sunday, July 25, 2010

produce

It has been way too long!  I was visiting family for a couple of weeks, and then I was so behind with pictures!  And soon I'll be moving ... But I promise I will diligently show you my adventures in my new kitchen!

The other day my best friend from high school was visiting, and we went to a little farmer's market and I found these beauties.  I love colorful produce!
I made a simple roasted chicken for dinner, with colorful fingerling potatoes, these carrots, red & yellow onions, and bread from this book.  It was fabulously colorful and flavorful.

Recipes to come, I promise!

Wednesday, June 23, 2010

birthday party for kids

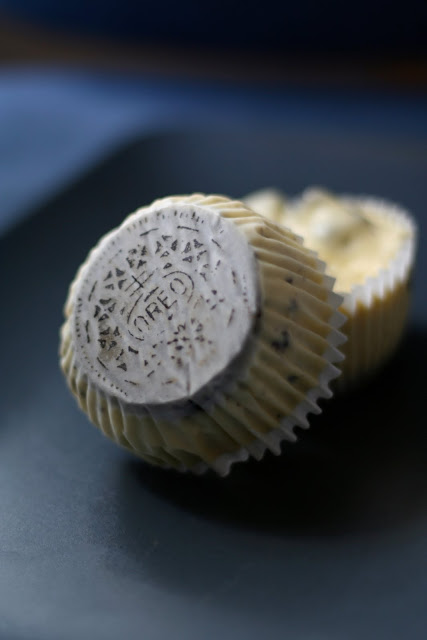
My daughter just turned 2.  Not kidding! I can't believe it, myself!  This lucky girl got to celebrate a couple of times because on her actual birthday we made roasted banana cupcakes (bananas are her favorite food and monkeys are her favorite animal, so I found it very fitting) with honey cinnamon frosting.  And then, she's lucky enough to have a best friend who has the same name as her, who happens to celebrate her birthday less than 2 weeks before!  So we had a mini birthday party for the girls with mini oreo cheesecakes for each person.  So happy birthday to my sweetie.  Hope you enjoyed all of the treats!  (Because you're not getting any for a while after last weekend;) )

Both of these recipes come from Martha Stewart's Cupcakes, which I got for my birthday from my friend Lori.  Cupcakes are so trendy in food these days, and for good reason.  It's such a fun way to entertain.  And cupcakes can be anything from really simple and casual to very decadent and elegant.  I love reading through it and learning more about decorating and baking.  It has a TON of amazing ideas and recipes, so go out and get this book!  If you have kids, or somehow have become the go-to person for bridal/baby showers, you'll really appreciate having this in your library.

Roasted Banana Cupcakes (frosting recipe follows)
makes 16~18 (weird number, I know.  Just do it in 2 muffin pans with 9 in each)

3 ripe bananas, plus 1 for garnish
2 C cake flour, sifted
1/2 t baking soda
1/2 t baking powder
3/4 C sugar
3 large eggs, seperated
1/2 C sour cream
1 t pure vanilla extract

  1. Preheat the oven to 400°F.  Line a standard muffin tin with paper liners.  Place 3 whole unpeeled bananas on a rimmed baking sheet and roast 15 minutes (the peels will darken and the fruit will release some liquid).  Meanwhile, sift together cake flour baking soda, baking powder, and salt.  Remove bananas from oven and let cool before peeling them.  Reduce the oven temperature to 350°F.
  2. With an electric mixer on medium-high speed, cream butter and sugar until pale and fluffy.  Add egg yolks, one at a time, beating until each is fully encorporated, scraping down sides as needed. Add roasted bananas, and beat in to combine.  Add flour mixture in 3 batches, alternating with sour cream in 2 batches, and beat until just combined after each addition.  Beat in the vanilla.
  3. In another mixing bowl, with an electric mixer on medium speed, whisk the egg whites to soft peaks; fold one third of the white into the batter to lighten.  Gently fold the rest of the whites in 2 batches until no streaks remain, careful to avoid deflating the batter.
  4. Divide the batter evenly among the lined cups, filling each about 3/4 full.  Bake, rotating tins halfway through, until a cake tester inserted in the middle comes out clean, about 20 minutes.  Transfer to wire racks to cool completely.
Honey-Cinnamon Frosting


2 C confectioner's sugar
1 C unsalted butter, room temperature
2 T honey
1/4 t ground cinnamon

With an electric mixer on medium speed, beat all ingredients together until smooth.  Use immediately.  If storing, store in an airtight container up to 5 days.  Bring to room temperature and beat until smooth before using.

Mini Cookies and Cream Cheesecakes
makes 24+
The beauty of this recipe is how simple but delicious it is.  Isn't it genius to use an oreo on the bottom?

1 pack of original (not double stuffed) oreos, 24~30 left whole and 15 coarsely chopped
2 pounds cream cheese (yup. that's 4 packages)
1 C sugar
1 t pure vanilla extract
4 large eggs, lightly beaten
1 C sour cream
pinch of salt
  1. Preheat oven to 275°F.  Line standard muffin tins with paper liners.  Place 1 whole cookie in the bottom of each lined cup.
  2. With an electric mixer on medium-high speed, beat cream cheese unti smooth, scraping down sides as needed.  Gradually add sugar, and beat until combined.  Add vanilla.
  3. Drizzle in eggs, a bit at a time, betaing to combine and scraping down sides as needed.  Beat in sour cream and salt.  Stir in the chopped cookies by hand.  (don't want to over mix or the batter will start to turn grey.)
  4. Divide batter evenly among cookie-filled cups, filling each almost to the top.  Bake, rotating tine halfway through, until filling is set, about 22 minutes.  Transfer tins to wire racks to cool completely.  Refrigerate (in tins) at least 4 hours, or up to overnight.  Remove from tins just before serving.

so behind

June is the busiest month for me.  We have about 8 birthdays in our extended family, 2 of those are me and my daughter.  And then there's father's day.  And this year, we're taking a trip to Utah!  Hooray!  So I've been busy.  Lots of cooking that I need to catch up on!  So to you loyal readers that have had nothing to read, I'm sorry.  I'm here.  I'm alive.  I'm well.  I'm happy!  And I'm still in the kitchen ... just not so much on the computer.  So here I am, ready to fill you in on the delicious treats we've been eating.  A lot of it has been desserts, which I doubt anyone has much of a problem with.  Except maybe  Melissa, who I'm always trying to impress with my healthy "gourmet" (or just not "diet) recipes.  So Meliss, I'll post some yummy Japanese recipes for you so you and Katelyn can make them together!  Meanwhile, ignore these posts and read this book.  You'll love it.


So maybe I'll work backwards.  For my sweetheart, I decided only the most decadent would be acceptable.  So I made him the gorgeous coconut pudding.  It was divine!  And the caramel sauce on top made it even more unbelievable evil for your body.  But it's father's day, right?  Just go run a few extra miles!


I can't claim the recipe for this one, so I'll just direct you to it.  It was so easy, and so rich!  And bursting with fresh coconut flavor.  You just have to make this!  But one thing.  PLEASE don't use sweetened coconut flakes.  Go to a health food store and buy unsweetened flakes.  It's cheaper and so much better tasting.  And sweetened coconut flakes would make this delight much too craggy and dense and ... of course, much too sweet.


You can find the recipe here.  Except I use the classic caramel sauce I always use from this genius foodblogger.
 Isn't it just beautiful?  I promise, it tastes as good as it looks.

best treat ever

I've introduced the amazing one ingredient ice cream to all of you, and now it's time for another delicious slightly less guilty frozen treat.  I am in love!  It's not what I'd call "healthy" by any means, but it is definitely FULL of chocolate flavor without any fat.  I am completely in love with this recipe and I think I'll be making it again and again.

I don't drink coffee, and everywhere I read, chefs and foodies say coffee brings out the flavor of chocolate, so I use a natural coffee substitute called Pero.  And it's true.  That dark, rich, bitter taste really heightens the flavor of chocolate.  SO good.

Chocolate Sorbet
makes roughly 2 quarts
2 C sugar (I used evaporated pure cane sugar and gave it a whirl in the food processor to make it super fine.  But of course, normal granulated sugar works great)
1 C high quality cocoa powder (this is the main ingredient so you definitely want it to taste good)
1/2 t pure vanilla extract
1/4 t ground cinnamon
1/4 coarse sea salt
1/4 C Pero, "bloomed" in 1/3 C boiling water
  1. In a large saucepan, mix the sugar, cocoa powder, vanilla, cinnamon, and salt.Stir in 4 C water and the pero/water mixture.  Cook over low heat until the ingredients are completely dissolved.
  2. Transfer to a large container and refrigerate until very cold, at least 2 hours.
  3. Once the mixture is well chilled, freeze the mixture in 2 batches in your ice cream maker, according to manufacturer's directions.  The sorbet will still be very soft, so place it into plastic containers with lids that seal.  Place a sheet or parchment or plastic wrap right against the surface before sealing the lid.  This will prevent freezer burn and keep it fresh longer.  Freeze for at least an hour, until firm enough to scoop.

Saturday, June 5, 2010

more cravings

I was reading through a cookbook and came across a pan banga and HAD to have it right away.  But I didn't have all of the ingredients, so I had to improvise, and it was really good!  But I'm going to go out and buy the right ingredients and make it again.

trying new things

Has it really been a week and a half since my last post?  Sheesh!  Well, this should make up for it.  I love risotto, but I rarely ever make it.  There's something about standing in front of the pot, constantly stirring that is just too much work.  Especially compared to the usual dump, rinse, and push a button that is required of me when I use my most frequently used kitchen appliance: the handy dandy rice cooker.  Couldn't live without that thing.

Anyway, I found a new recipe for barley risotto, and I had to give it a try.  With completely different add-ins.  Now, I realize that risotto comes from riso, which means "rice" but apparently you can use the same technique for some other grains.  And it really worked well with pearled barley.  It turns out a little chewy, and it's really delicious.  And I thing making it with eggplant and mushrooms was a good idea.  Yum!
 
1 cup pearled barley
3 C vegetable or chicken stock (buy low-sodium, but it's best--and so cheap and easy--to make it yourself)
2 T olive oil
1 onion, finely chopped
3 T minced parsley
2 Japanese eggplant, stem and end removed, cut in half lengthwise and sliced 1/2 inch thick
8 oz white button, shiitake, or cremini mushrooms, cleaned, stems trimmed (removed for shiitake), and sliced
1/2 freshly grated parmesan cheese, plus more for garnish
  1. In a medium saucepan, bring stock and 2 C water to a simmer, reduce the heat to low, and cover, to keep warm.
  2. In a large skillet, heat 2 T olive oil over medium-high heat.  Toss in the eggplant, season lightly with salt and pepper.  Flip over, and cook through.  Eggplant should have a soft, creamy texture on the inside.  If it's at all spongy, it's underdone.  Remove the eggplant from the pan and set aside on a plate.  Add the mushrooms, season lightly with salt and pepper, and let brown.  Remove from pan and set aside.
  3. Meanwhile, heat oil in a large saucepan over medium.  Add onion, season with salt and pepper, cook, stirring occasionally until softened, about 5 minutes.  Add barley; cook, stirring, for about 1 minute.  Add 1/2 C stock; cook, stirring, until absorbed, about 1 minute.
  4. Ladle in about 2 more cups of stock; cook, stirring frequently until almost completely absorbed.  About 10 minutes.  Continue to add 1 C of stock at a time, waiting for the liquid to be almost completely absorbed before adding more, until barley is tender and the mixture is creamy, 40~50 minutes.
  5. Add in sauteed eggplant and mushrooms.  Remove from heat, stir parsley and parmesan.  Season with salt and pepper.  Serve immediately, garnished with more cheese.

color

I love food that has lots of color.  And fish tacos have lots of color.  (And to prove it to you, this photo is completely untouched) It was such a simple meal, and SO delicious, I can't believe we don't make these more often.  It's going to be a Summer standard, I think.

I don't really think I need to write a recipe since it was so simple.  I just pan fried some well seasoned white flesh fish (tilapia, in this case).   I just seasoned with salt, pepper, and a little cumin, and then squeezed some fresh lime over the top.  I combined it with finely shredded red cabbage, avocado, fresh salsa*, sour cream, some sauteed fresh corn, cheese, and some lime juice on top of it all.  Yum!
* for the salsa:

juice of 1 lime

1/2 vidalia onion, diced small (if you don't have vidalia, use any onion, dice small and soak in water for at least 30 minutes, changing the water at least twice)
4~6 sweet tomatoes or 1 whole package grape/cherry tomatoes, diced small
1 bunch cilantro, chopped fine (and I mean FINE)
salt to taste
 

Combine all the ingredients in a bowl and toss. Serve.

Tuesday, May 18, 2010

cravings

We eat Japanese food at least twice a week in our home.  I love how it tastes and how it makes me feel.    So this may come as a surprise to most of you, but I've never made sushi at home.  I've made it on special occasions with my family, and I've eaten the "real thing" at some incredible places in Tokyo, but that's it.  I've never made it for my own family.  And really, sushi is a special occasion kind of thing, not an everyday food by any means, but I decided it was time.  Especially for my little girl to eat some!  Afterall, being a 1/4 Japanese, she's going to be asked her whole life if she likes sushi or not.  So she better know what it is.

Oh, and she does like it, by the way.

So just in case you didn't know this, sushi doesn't mean raw fish in Japanese.  It refers to the way the rice is prepared.  And sushi can have cooked fish, sometimes even egg on/in it.

We decided on the simple California Roll.  With short grain brown rice instead of white.  Not at all traditional, but I wasn't about to try nigirizushi since pretty much only trained sushi chefs make that, and some of the other ingredients that usually go in makizushi aren't so readily availabe here.  And I like avocado.  And I got a huge bag at Sam's this week for our fish tacos.


Brown Rice California Rolls
serves 2
For the rice:
1.5 C short grain (brown--optional) rice
1.5 C water
1/4 C rice vinegar
2 T sugar
1/2 t salt
  1. Wash rice until water runs clear.  Cook with water in a rice cooker.  (Or cook it on the stove top like most people;) )
  2.  In a small pot, put the vinegar, sugar, and salt.  Heat over medium heat and stir occasionally until the sugar is completely dissolved.
  3. Once the rice is cooked, transfer to a large bowl (ideally a Japanese wooden bowl designed for sushi), and pour over the vinegar dressing over the rice.  Toss the rice with a flat wooden spoon or a rice paddle, with horizontal slashing strokes.
For the sushi: (depends on how much you want to put in)
vinegar rice
2 sheets toasted nori seaweed
1 egg, lightly beaten
crab meat (or imitation crab, which is what you'll usually get at a sushi place)
avocado, sliced thin
seedless cucmber, cut into thin, long strips
  1. Cook the egg on medium heat into a very thin "pancake", remove from pan and let cool.  Once cooled, cut the egg pancake into thin strips.  Cut the crab meat into thin, bite sized pieces.
  2. Using a bamboo sushi rolling mat, place the nori down with the shiny side up.
  3. In a thin layer, place some rice over the nori, leaving a 3/4 inch gap at the top and bottom.
  4. In a horizontal line, layer the ingredients.  Then, using the rolling mat, tightly roll up the nori around the rice and filling.  Using your finger, spread some water over the exposed nori and seal shut.
  5. Using a very sharp knife, slice the roll into 6~8 pieces.  It's easiest if the sushi is chilled a little bit.

Tuesday, May 11, 2010

another one of those last minute meals

In fact, I looked in my fridge and saw parsnips and broccoli that needed to be eaten pretty quick, so I got them prepped while I thought what in the world to serve with that.  Afterall, you can't really have a dinner of just pureed parsnips and roasted broccoli, can you?

So I made aglio e olio, but this time with fabulous minced shallots along with the minced garlic.  Good choice!
These were all so simple that I don't feel like I need to add a recipe. 

For the pureed parsnips, I peeled and cut off the ends of 2 medium sized parsnips, cut them into little pieces, and boiled them in slightly salted water.  Then I drained them, threw them in the food processor with about a tablespoon of butter, salt and pepper to taste, and a little (about 2 T?) whole milk.  After tasting it I felt like it needed a bit of a bite so I added some freshly grated Pecorino Romano cheese.  My baby girl ate a ton!  It's similar to the texture of mashed potatoes, but silkier and a VERY different flavor.  It's kind of sweet, almost floral.  You have to try it sometime!

Roasted broccoli, I'm sure I've had on here before.  450°F oven, cut broccoli into bite size pieces, toss in salt, pepper, olive oil.  Roast in the oven until the florets are crispy and browned and the stems are no longer crunchy.

And the aglio e olio I've done before.  It's a staple in our home.  It's a nice simple but delicious dish that goes with ANYTHING.  Fish, chicken, even heavier meat, and of course--like tonight--veggies.

Tuesday, April 27, 2010

had to get creative

I didn't have too many vegetables in my fridge today and did a poor job of planning out my meals for the week, so I had to get creative with dinner tonight.  I made a sort of spaghetti alla carbonara without the bacon and used asparagus instead.  I don't really know what to call it, but it was good!  And a nice change from the heavy (but delicious) carbonara.  I think this might make it into our usual rotation.

Spring pasta alla carbonara, minus the bacon (how's that for a name?)
enough for 1 lb of pasta
1 lb long pasta such as spaghetti or linguine
1/2 lb asparagus spears (the thicker the better)
3 cloves garlic
1 C (approximately) finely grated Parmigiano Reggiano or Pecorino Romano cheese (depending on your tastes and what's available)
3 eggs
juice of 1/2 lemon
coarse salt
fresh ground black pepper
3 T extra virgin olive oil
  1. Heat the oven to 200°F and place a large oven safe serving bowl in the oven.
  2. Cook the pasta to al dente, reserving about 1/2~3/4 C of pasta water.
  3. Prepare the asparagus by snapping off the tough end of one or two spears then trimming the rest to the same length.  Peel the last inch or the skin off to eliminate stringy ends.  Line up the asparagus and cut into 2 inch pieces.
  4. Slice 2 of the garlic cloves very thin.  In a large skillet, pour 1 T olive oil and bring to medium high heat.  Place the asparagus in the skillet, sprinkle with salt, and saute until the skin starts to wrinkle a little and brown in some spots.  Add the garlic slices, and bring the heat to medium.  Continue to let cook, tossing occasionally, until garlic is very frangrant and the asparagus is tender.  Add the remaining olive oil and set aside.
  5. Grate the remaining clove of garlic.  Then in a medium bowl, whisk together the eggs, cheese, grated garlic, and lemon juice.  Add as much or as little fresh cracked black pepper as you'd like.  (I like a lot for that rich carbonara taste)
  6. Quickly pull out the bowl from the oven, put all of the hot pasta in the bowl, pour all of the asparagus and garlic and oil on top, then toss with tongs.  While tossing, slowly pour in the egg mixture.  Add some reserved pasta water to loosen the sauce if needed.  Make sure to keep tossing and get all of the egg mixture encorporated until smooth and creamy.  Serve warm.

Tuesday, April 20, 2010

cake make over

I love a good citrus cake.  I grew up eating them in French style bakeries in Japan, where they don't use a ton of sugar in order to enhance the delicate citrus flavor.  And somehow they're really light but moist.  I discovered several recipes for a classic French yogurt cake, and needed to give it a go.  I made it according to the recipe yesterday and ... sadly ate a few too many pieces.  And then today I wanted to tweak the recipe a bit to make it healthier--for a cake.  And for some reason it turned out more moist and tender.  I absolutely love this cake!  I used blood oranges today instead of lemons or limes and I love the milder flavor (but I might prefer the brighter tang of the tarter fruit).  The batter was even a rosy pink, but sadly it baked up yellow like any other cake.  I used extra virgin olive oil as an experiment, and I loved the result.  And I just feel good knowing it's olive oil in there:)

So if you're in the mood for a tasty but less guilt-ridden cake, you should try this out.  Just don't fool yourself into thinking you can have a lot;)  It's still a cake, after all.

Blood Orange, Yogurt, and Olive Oil Afternoon Cake
1 C plain yogurt (I actually used fat free and it turned out so well! But use any kind of plain yogurt you want)
2/3 C sugar, plus more for dusting the pan
1/4 C extra virgin olive oil
zest of 2 blood oranges
1/4 C fresh blood orange juice
2 eggs
1 2/3 C all-purpose flour
1 1/2 t baking powder
1/2 t baking soda
1/8 t salt
  1. Preheat the oven to 350°F.  Grease the sides and bottom of a 9 inch cake pan.  Line the bottom with parchment paper and grease again.  Sprinkle about 1 1/2 T of sugar to coat the bottom and sides of the pan.
  2. In a large mixing bowl, whisk together the yogurt, oil, sugar, zest and juice of the blood orange until combined.  Add the eggs, one at a time, whisking in completely with each addition.
  3. In a separate bowl, whisk or sift the flour, baking powder, baking soda, and salt.  Add to the liquid mixture, and stir until just combined.
  4. Pour the batter into the prepared cake pan and bake for 35~40 minutes, or until a toothpick inserted into the center comes out clean.  Let cool in the pan for 10 minutes, then release from the pan and let cool completely.  Serve with a dusting of confectioner's sugar or some citrus whipped cream and some fresh fruit on the side.

Tuesday, April 13, 2010

one ingredient ice cream

You heard me.  One ingredient.  And surprisingly yummy.  I heard about this a few months ago and tried it right away, and I don't think I wrote about it here.  It's a really nice refreshing dessert for those creamy-sweet cravings, without all of the guilt.  This one ingredient is sweet and creamy and really pretty good for you.  Bananas.  It sounds crazy and potentially not tasty, but it really is impressively smooth and creamy and perfect.  All you do is freeze your ripe bananas (make sure they're ripe or it'll turn out bitter), and once they're frozen, throw them in your food processor.  You might have to add a teaspoon or two of milk (or soy milk, almond milk, whatever) but nothing else.  Turns out like soft serve and you can eat *almost* as much as you want without feeling guilty at all.  Yay for amazing healthy treats!

pizza pizza

I know, I know, I said I was going to eat Japanese food this week.  And I have, actually.  I've eaten at least 1 Japanese meal a day, sometimes 2 or 3, and I am feeling great!  Tonight had to be something simple and quick, though, and since I had dough in the fridge, I decided on healthy pizza.  We eat a lot of homemade pizza.  So tonight had to be a little different, so I tried my artisan bread dough for the pizza dough (fantastic idea and couldn't be simpler), and the toppings were fancy but very low maintenance.  And of course, delicious.  My kind of dinner.
For toppings I used sliced, sauteed cremini mushrooms, tiny pieces of eggplant, leeks, and the usual sauce and cheeses.  The crust was perfectly crisp.  It was really good.  What kind of pizza topping combinations do you like to try?

Saturday, April 10, 2010

needing the veggies

I've been feeling sluggish.  The annoying part is that I've been running and watching what I eat, so I didn't know what to do!  Then I started thinking about when I feel the best.  It's when I eat what I think my body is meant to eat.  Japanese food.

I was watching the Martha show and got really hungry when she was making this recipe.  I'm generally a purist when it comes to Japanese food, but this one seemed too good to pass up.  And then I picked up one of my favorite books, "Japanese Women Don't Get Old or Fat", and was inspired to get back to my roots.  And though this recipe isn't really Japanese, I wanted it.  I made some adjustments to make it more my style, of course.  And I was in heaven.  Then we had yoplait's new Greek yogurt, honey, and fresh strawberries for dessert.  They aren't kidding in those commercials when they say that one healthy decision leads to another.

Soba salad
Coarse salt
8 ounces snow peas (or sugar snap peas), trimmed, strings removed
12 ounces soba noodles
2 tablespoon plus 1 teaspoon sesame oil, plus extra to brush on tofu slices
2 medium carrots, about 1/2 pound, peeled and shaved into thin strips using a vegetable peeler
3 inch piece of daikon (Japanese white radish), peeled and shaved into thin strips using a vegetable peeler
1 teaspoon grated fresh ginger
4 scallions, thinly sliced crosswise
1 tablespoon soy sauce
2 t fresh lemon (or if you can find it, yuzu) juice
4 large perilla leaves, cut into a chiffonade
1 block firm tofu, cut into 1/2 inch thick rectangles, then into triangles
  1. Cook noodles in a large pot of boiling water until cooked through, but still slightly firm to the bite.  Drain, set aside to cool.
  2. In a small pot, blanch the snow peas.  Drain, set aside.
  3. Place the tofu slices on a baking sheet, brush with a little sesame oil, and place under the broiler until slightly crispy on top, about 7 minutes.
  4. In a small bowl, combine the salt (to taste), 2 T and 1 t sesame oil, ginger, soy sauce, and lemon juice.
  5. In a large bowl, toss together the noodles, carrots, daikon, sugar snap peas, perilla, scallions, and tofu.  Pour over the sauce and toss to coat.  Serve at room temperature or cold.

Friday, April 9, 2010

lunch

My cute husband came home early from work today, so we got to have lunch together.  I taught a class at church last night on artisan bread, and we made some varieties.  One was herb bread.  I'm not always a fan of herb bread.  It's usually so overpowering that I think it distracts from the meal instead of complimenting it.  So I made it really subtle.  But today for lunch, I decided to try using the leftovers for some good ol' grilled cheese sandwiches.  And oh my goodness, I wish I had a sound clip to share with you of the moment we bit into our sandwiches.  Unreal crunch!

So if you're needing some variety in your grilled cheese (not that you need to, it's such a classic!), try it with some flavored artisan bread.  And use olive oil instead of butter.  You'll get the most beautiful golden exterior with a perfect, perfect crunch.  And that subtle herby aroma is a really nice change without being too distracting.

Tuesday, April 6, 2010

yum

I had this for dinner.  You have to try it.

Monday, April 5, 2010

my old favorite

I've mentioned before that my sister was my inspiration to start this blog.  And along with my mom, the reason I love to cook.  She always impressed me so much with her perfect meals.  It seemed like she never failed.  She could perfectly frost a cake, make an array beautiful Japanese dishes, and put together a casserole.  Now, casserole can seem quite quaint, not really gourmet, but hers were a different story.  Not your usual bland thrown in a baking dish and bake kinda thing.  And that's where tonight's dinner comes in.  When I was in high school I visited my sister and she made this fairly simple chicken, zucchini, and pasta with white sauce casserole.  But it was so ... Japanese, actually.  Not like soy sauce and miso kinda Japanese, but like the simple palate and skill that a typical Japanese mom possesses.  And I asked her to teach me how to make it.  And being the overachiever that she is, she made me a cookbook instead.  And this recipe was in it.  Along with the chocolate cream cheese frosting and vegetable curry that are still my go-to recipes.  I've never found an improvement on some her old classics.  Like I said, she's my foodie hero.

And tonight, after my big run, I wanted something hefty but not heavy.  If that makes sense.  And I remembered my favorite old classic that my sister used to make.  But I used broccoli instead, mainly because with broccoli you don't have to saute it ahead of time (unless you use big pieces, which I like), and because that's what I had in my fridge.  It makes a big 9x13 inch pan size, so we have leftovers, which is always nice, too.  And it was exactly what my body was craving.

Lisa's casserole
serves 6~8
1 lb penne or other short pasta (I used mini penne here)

bechamel:
1/2 red onion (any onion will do, I just used what I had on hand, and isn't it so pretty?), roughly chopped
3 C milk
3 T butter
3 T flour
pinch freshly grated nutmeg

2 chicken breasts, trimmed and cut into 1/2~1 inch cubes
neutral tasting oil
2 heads broccoli, stems removed and cut into bite sized pieces

crispy topping:
1/4 C panko or fresh bread crumbs
1/4 C finely grated parmesan cheese
1~3 T (depends on what you like) minced fresh flat leaf parsely

salt and pepper to taste
  1. Bring a large pot of salted water to a boil, cook pasta to al dente.  Drain and set aside.
  2. Meanwhile, season chicken with salt and pepper.  Heat a large skillet with 1 T oil over medium-high heat.  Once the oil is shimmering, add chicken pieces.  Spread to a single layer and let brown.  (don't move it around until browned on each side)  Brown on all sides, remove and set aside.  If your broccoli pieces are large, briefly saute just to brighten the color and soften the stems slightly.
  3. In a large sauce pan, melt butter over medium heat.  Add onions.  Cook until onions soften.  Add flour and stir, cook until flour slightly browns and loses the raw flour taste.  Add milk slowly while whisking quickly.  Continue whisking gently while the sauce thickens.  Season with salt, pepper, and nutmeg.
  4. In a large bowl, stir the pasta, chicken, broccoli, and bechamel together.  Place in a 9x13 baking dish.
  5. In a small bowl, combine the panko, cheese, and parsley.  Sprinkle evenly over the top of the pasta mixture.  Place under the broiler until golden brown and slightly bubbling.

Sunday, April 4, 2010

a challenge

Since my cute cousin Eliza decided to challenge me to make some naan, I thought I'd better follow through.  And since I had leftovers from a huge pot of curry I made, there was no better time than today to try.

Naan is a special item for me.  When we were kids, my parents took us to this incredible Indian restaurant in Tokyo called Moti.  And I may have mentioned earlier on this blog that the owner's son went to the same school as my brother, so his mom taught my mom how to make their signature butter chicken curry.  And it became a family staple.  But one thing we never recreated was the naan.  It was this special Moti treat for me, and I seriously think I would eat several pieces whenever we went.  Indian curry is just better with naan.  Somehow chewy and crispy at the same time, smothered in ghee.  Love the stuff.  I know the method they're made is so unique to naan that I just never thought you could make it at home.  Not the way it should taste, anyway.  But boy, thanks to this book that I can't stop talking about, I made naan.  And not that store bought, dry, dense stuff.  No, no.  It was chewy and puffy in some parts and charred and crispy in others.  Perfectly how naan is supposed to be.  I even made some clarified butter, which was a little labor-intensive, but it made it perfect.  And the whole thing was so easy!  I don't think I can go back to naan-less Indian curry again.
you can find the recipe here.

if you can call them leftovers ...

When I made my cinnamon swirl brioche, I made 2 loaves so that we could have some french toast with the second loaf.  And I know, I keep saying I'm trying to lose weight and eating brioche is probably the stupidest thing I could be doing to reach that goal ... But it was a special weekend and I'll run it off this week.  Hopefully;)

If you're making French toast with a delicate sweet bread like brioche or challah, I recommend the America's Test Kitchen method, which is to toast the bread first.  I just put the slices on a cookie sheet, stuck them in a 250° F oven for a while until they got dried out and just barely crispy.  Flip them over, and do the same on the second side.  This worked out well because last time I tried to make French toast with brioche, the slices had a hard time holding up in the custard.  But these guys did awesome!  And they soaked in the custard perfectly and it was delightful.  I was a good girl, though, I only had one slice.

As for the custard, I think everyone has their own family/individual recipe.  I'd never made french toast until I was married (because it's my husband's absolute favorite) so I had to figure out a recipe I liked.  And I LOVE it.  What do you like to put into your custard?  Cinnamon?  Vanilla?  Nutmeg?  What's your egg:milk ratio?  Do you sweeten it?  Tell me, tell me!  I'd love to know how other people do it.

Saturday, April 3, 2010

new curry

I've been pretty into curry lately.  And today, I wanted to go all out.  So I bought some turmeric and garam masala, 2 spices I haven't owned in a long time.  And my curry tasted amazing!  And I even made turmeric rice, and I felt super cool and authentic, even if I was just fooling myself since I didn't use jasmine or basmati rice ... I used my staple Japanese short grain.  I know, I know, I should be ashamed of myself.  But I'm Japanese.  And in my mind rice should stick together;)

So I accidentally used way too much spice (because I tend to just throw things in and not follow a recipe ...) so I ended up making a massive pot of curry.  So unless you're serving a huge crowd, you'll want to half this recipe for sure.

If you don't like shrimp, use some other meat.  If you don't like mushrooms, use whatever vegetable you think works well.  That's the beauty of curry.  There's so much you can do with it.  Just have fun and explore.

My dinner tonight: Shrimp & Mushroom Curry
serves 10?
3 T garam masala (or your regular old curry powder.  It'll be a different result, but it's still fantastic!)
1 t cumin
2 t paprika
3 t turmeric
1/4 t saffron threads (optional)
1/4 t crushed red pepper flakes
3~4 cloves garlic, minced or grated fine
1 T grated fresh ginger
1 large red onion, sliced (pole to pole)
1 lb mushrooms, sliced (any variety you want to use.  As usual, I used white buttons just because they're the most affordable)
1/2 lb shrimp, tails removed and deveined
olive oil
butter
salt to taste
2 cans petite diced tomatoes
2 cans coconut milk (like I said, I made a HUGE pot)

to serve:
turmeric rice*
fresh cilantro
toasted sliced almonds
golden raisins
  1. In a large heavy bottom pot, heat 2 T butter and about an equal amount of olive oil over medium-high heat until butter is melted.  Season the shrimp with salt and cook until opaque on the surface and some browning occurs, but not cooked through.  Set aside.
  2. Add the garlic, ginger and onions to the pot and cook, stirring frequently, until the onions begin to soften.  Add the mushrooms, and cook until browned.  Add the rest of the spices and stir to coat.  If it seems dry, add a little water to prevent burning.
  3. Add the tomatoes.  Let simmer until tomatoes reduce slightly and get pulpy.  Add the coconut milk and let simmer briefly to slightly thicken.  Serve over hot rice or with naan.
*To make turmeric rice, all you need is a teaspoon or two of turmeric in your rice water and cook as you normally do.  (I also added some saffron threads because I'm lucky enough to have a friend who went to Spain a few months ago and bought me some!  I know, right?  I have cool friends who know me well)  For me that meant pushing the "start" button on my rice cooker ...  Add a handful of peas at the end if you like.  And I think using some butter on the rice is typical, but I kept is simple.  I figured there was enough butter in the curry.

weekend breakfast

This weekend is a special weekend for my family.  Of course it's Easter, which is such an important day to celebrate the Atonement and Resurrection of our Savior.  Definitely one of my favorite holidays.  And as if that wasn't cool enough, our church is holding it's Semi-Annual General Conference.

It's a really important occasion for me, so I like to make it enjoyable for my family.  Especially for my kids who are still a little too young to appreciate it fully.  So I've planned a bunch of fun activities for my toddler, and of course I made a fantastic breakfast to start off our day.  I made my usual brioche recipe from my favorite bread book, but found this idea from their blog and decided to give it a go.  Mine didn't turn out looking quite as cool as hers (but she is, afterall, a CIA graduate, and a pastry chef, no less), but it did turn out beautifully.  And it was delicious!  I usually make cinnamon rolls, but this was a nice variation.  And this way, I can have my favorite savory breakfast foods like creamy eggs and perfect hash browns, while my cute husband gets his fill of sweet food.  Can't wait to make French toast with the leftovers tomorrow.

Tuesday, March 23, 2010

let's change it up


Tuesdays aren't my favorite day of the week.  My husband teaches an evening jazz combo group at a local high school, so I have very little time with him, to go running, and to make dinner.  So I always have to come up with something fast.  And I'm trying to lose weight so it has to be something that works with that.  And, most important to me, it has to taste good.  So coming up with new ideas for that every week can be a challenge.  But I love food challenges.

One of my favorite meals is a good creamy mushroom pasta.  But that much heavy cream and butter isn't exactly everyday cooking.  So I had to make some adjustments, and I really liked it!  I used some turkey smoked sausage to add flavor, which actually made it so I didn't add ANY salt to the dish.  Except to cook the pasta.  I never cook pasta without salt.  The key to the turkey smoked sausage was to slice it thin so it can distribute and taste like there's a lot in there, and brown it.  I know it's pre-cooked, but it's just kinda rubbery and plastic-ey if you don't brown it.  The second thing I did was the reduce whole milk instead of using heavy cream, and of course it's not as rich and creamy, but it was still a nice, dense sauce, with lots of good dairy flavor.  But don't skimp and use low fat or fat free milk.  It won't work, I promise.  The third thing I did was garnish with a dollop of ricotta cheese.  Just another nice layer of dairy.  Try it out!

Healthy Mushroom and Sausage Rigatoni
serve 4~6 

1 lb rigatoni
salt for pasta
8 oz mushrooms (white button or cremini work well here), sliced
1/4 link of turkey smoked sausage, cut in half lengthwise and sliced thin
1/4 C whole milk
2~3 cloves garlic, minced
pepper to taste
canola or olive oil for cooking
1/4 C finely chopped fresh parsley
3 T freshly grated Parmigiano Reggiano or Pecorino Romano cheese
part-skim ricotta to serve

  1. In a large pot, bring water and salt to a boil and cook pasta to al dente.  Reserve 1/2 C pasta water.  Set aside.
  2. Meanwhile, in a large saute pan, bring about 1 T oil to a shimmer over medium-high heat.  Add the mushrooms and garlic and cook, stirring occasionally, until mushrooms begin to brown.  Make sure the mushrooms are in a single layer and not too crowded.  
  3. Add sausage, and cook until browned.  Add milk and lots of fresh cracked black pepper, and scrape up any browned bits on the bottom of the pan from the sausage.  Let simmer, stirring occasionally, until sauce thickens.  Add cheese and stir to combine.
  4. Add the pasta and parsley, and toss to coat.  Add some reserved pasta water to loosen the sauce.
  5. To serve, sprinkle with extra parsley, parmesan cheese, and a dollop of ricotta cheese.

Wednesday, March 17, 2010

green dinner

We had a green dinner in celebration of St. Patrick's day.  I made roasted asparagus and broccoli in garlic infused oil, roasted Brussels sprouts with smoked turkey sausage and shallots, of course pesto with pasta, and my winner of the evening, green bread.  I just made our usual bread with green water I made by pureeing spinach and parsley and soaking it in water and straining the solids.  I ended up putting some of the solids in the dough because I thought it would add to the color, and I'm glad I did.  It had really little spinach flavor, if any, and was a fun naturally colored addition to the meal.

Did YOU make anything fun for your St. Patrick's day celebration?
 2 C Brussels sprouts, cleaned, stems removed, and cut in half
1 smoked turkey sausage, cut into quarters lengthwise, then cut into 1/2 inch pieces
1 shallot, sliced medium
salt and pepper to taste (go light on the salt, the sausage has plenty)
2 T softened butter
1/2 T canola oil
  1. Preheat the oven to 450°F.  Toss all the ingredients in a 9 x 13 pan.  Make sure the vegetables are evenly coated in the butter.  Roast in the oven for 20~25 minutes, until caramelized and slightly crispy in some party.  Let cool slightly, serve warm.
Roasted Broccoli & Asparagus:
1 head of broccoli
1 lb asparagus
2 T olive oil
2 T canola oil
4~5 garlic cloves
salt and pepper to taste
  1. Preheat the oven to 450° F.
  2. Cut florets off of the broccoli, leaving about an inch to two of stem.  Cut them into pieces small enough to eat easily, but big enough that they don't char in the oven.  Trim the bottom of the asparagus about an inch or two.
  3. In a small sauce pan, heat the oil and smashed garlic cloves over medium-low heat.  Once the garlic starts to sizzle a little and turn a golden-brown color, remove from heat and let cool slightly.
  4. Place the vegetables on a large sheet pan in a single layer, and pour over the oil and sprinkle with salt and pepper.  Toss to coat.
  5. Place in the oven and roast for 7~10 minutes, until tips are crispy and browned.
Basil & Hazelnut pesto:
(makes enough for 1 lb of pasta, with some leftover for toast!)
1/2 C basil leaves, removed from the stem
3 T parsley
1/3 C whole toasted (and peeled) hazelnuts
2 small or 1 large garlic clove
1 large shallot, cut into medium pieces
1/4 C extra virgin olive oil
3~4 T finely grated parmigiano reggiano or pecorino romano cheese
  1. In the bowl of the food processor, pulse together the basil, parsley, nuts, garlic, shallot, salt and pepper until chopped fine.
  2. With the spout open and the food processor turned to the on position, slowly pour in the olive oil until smooth.  If you need to, stop and scrape down the sides.  Add the cheese and stir to combine.  Serve with hot pasta.
Dessert.  I was too lazy to make anything, and this was really enticing for some reason.  And green:)

Monday, March 15, 2010

i guess it's pasta week

I've been really in the mood for pasta this week.  Which explains why we've had some form of it for 3 nights in a row, and I'm still planning a couple more for the next couple of days.  I guess that's the beauty of pasta, though.  You can have it all week and never get sick of it because there's such a beautiful variety of ways to eat it.  So tonight, I did a little spin on one of my favorites.  And it was a hit!  Though I do think it tastes better with cherry or grape tomatoes.  Much more bright flavor and slightly less juicy.  Either way it was amazing!  I added chopped spinach because I've been on a spinach kick lately, and because I'm still postpartum and on iron pills.  Thought I'd sneak in some natural iron into my diet where I can:)  I served it alongside a simple green salad with toasted nuts (pecans and hazelnuts), pecorino romano cheese, parsley, super thin sliced onions (soaked in water to remove the harsh raw onion flavor), tomatoes, and cucumber.  Oh, and of course some homemade bread.  It was nice to have an array of fresh food to eat.  I can't wait until Summer!
7~8 campari tomatoes, cut in half and then quartered
1 large bunch of parsley, chopped fine

1/4 C fresh basil, sliced into a chiffonade
2 T finely chopped fresh spinach
1-1/2 C parmesan cheese (I used pecorino Romano), grated

1 shallot, minced super fine
4 cloves of garlic, grated or minced fine
1/3 C olive oil
salt and pepper to taste

1/4 teaspoon crushed red pepper flakes

1 lb thin spaghetti

  1. In a large bowl, combine the oil, salt and pepper, parsley, basil, spinach, tomatoes, and garlic, shallot, and red pepper flakes. Cover with plastic wrap and let sit at room temperature for 2~4 hours.
  2. When ready to eat, boil pasta to al dente. Make sure and reserve a little bit of pasta water.
  3. Meanwhile, grate parmesan cheese and put in the bowl with the tomato mixture and toss to coat.
  4. Once pasta is done, place in the bowl with tomatoes and combine. Add a little pasta water to loosen the sauce if needed.
  5. Serve with extra cheese and crusty bread.